Creating A Text Editor In C# And Visual Basic
PREFACE
This tutorial will teach you how to create a text editor in C# or Visual Basic. You should already know either C# or VB and know how to navigate VS 2012. The tutorial will be split in two parts: Part A will focus on design and Part B will focus on coding. We will explain the code, however we will not go into great detail as you should already know the languages.
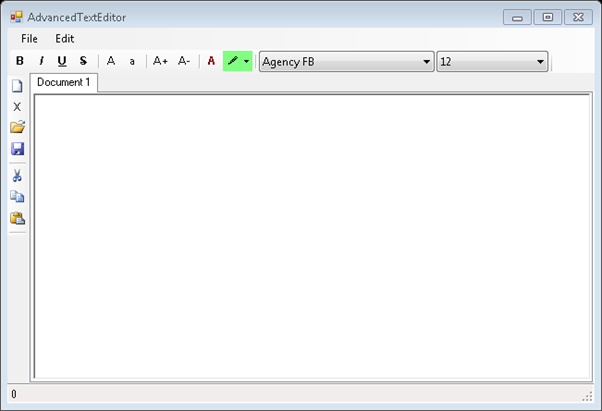
At the end of this tutorial you should hopefully have something like this:
Let’s get started!
[Download Project Files – Visual Basic – C#]
PART A – DESIGN
For this we will be using Visual Studio 2012 professional but you can use express if necessary.
For the sake of brevity we have left the control names with their default names.
SET THE SCENE
- Open Visual Studio
- Create a new project and choose the programming language of your choice
- Select Windows Forms Application and .NetFramework 4
- Name the project AdvancedTextEditor
- In solution explorer, right click on the Form and click rename, and rename it to AdvancedTextEditor. You will be asked if you wish to rename all references, click “Yes”.
- In the properties window set the form size and minimum size to 651, 445. Set the form text to AdvancedTtextEditor. If you wish you can also set an icon.
ADD THE CONTROLS
- From the tool box add a ToolStripContainer and then set the dock style to fill
- In the TopToolStripPanel add a MenuStrip and insert the standard items (a white/black arrows shows in the top right, click it)
- In the BottomTopStripPanel add a StatusStrip and in the StatusStrip add a Label
- In the LeftToolStripPanel add a ToolStrip and insert the standard items
- In the TopToolStripPanel add a ToolStrip under the menu and insert the standard items
- In the ContentPanel add a TabControl and in the TabControl collection remove the tabs, and then set the dock style of the TabControl to fill
- For the two ToolStrips added set the GripStyle to hidden
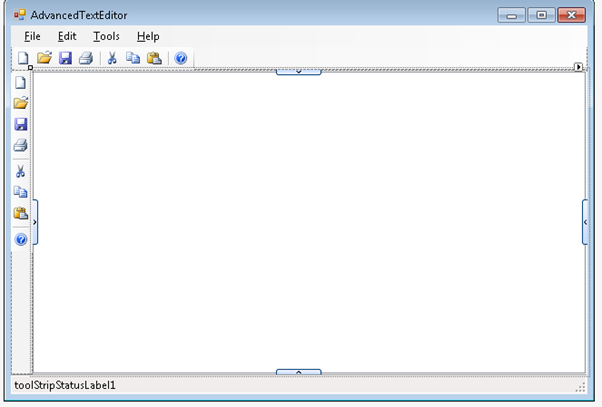
- Your form should look like the following:
Menu Strip
In the Menu Strip remove the Tools and Help menus, and then under File remove Print and Print Preview. Your menu should look like the following:
Side ToolStrip
In the LeftContentPanel from the ToolStrip remove the print and help buttons and add a new button under the New icon.
For the new button added, change the following properties:
- DisplayStyle = Text
- Text = X
- Name = RemoveTabToolStripButton (the name is required for this button to avoid conflict)
StatusStrip
For the label added to the Status Strip change the text to 0.
Top ToolStrip
For the ToolStrip added near the menu we need to change some things:
- Remove all the buttons added
- Add 4 buttons and a separator (to add buttons there is a drop down menu)
- Add 2 buttons and a separator followed by another 2 and separator
- Add 1 button and 1 drop down button followed by a separator
- Add two ComboBoxes
- For the first ComboBox added, set the following styles
DropDownStyle = DropDownList
FlatStyle = System
Width = 190
Do the same for the other ComboBox, but do not set the width.
- For all the buttons added set the DisplayStyle to Text
- The first 4 will be used for B, I, U and S (Bold, Italic, Underline and Strikeout)
- Set the text of these buttons to the corresponding function you also might want to apply the corresponding styles to. See the image below:
Next copy and complete the following, setting the DisplayStyle and Text properties.
The buttons will perform the following functions:
- First two = Casing
- Second two = Font Size
- Third two = Foregoroundcolor and Background color
For the drop down list we changed the font to Wingdings (a symbol font) and set the text to !. This shows the pen icon, and we also set the BackColor.
For the drop down button in the collections property and 3 MenuItems set the text property to nothing and set the BackColor property to Green, Orange and Yellow. Also the set name property to HighlightGreen, HighlightOrange and HighlightYellow.
Dialogs
Add the following dialogs:
- SaveFileDialog
- OpenFile Dialog
- ContextMenuStrip
- Timer
- ColorDialog
Timer
In the properties window set Enabled = True, Interval to 1.
SaveFileDialog & OpenFileDIalog
Set the FilterIndex to Text Files|*.txt|VB Files|*.vb|C# Files|*.cs|All Files|*.* Set DefaultExt to txt.
ContextMenuStrip
Add these menu items:
[ Continue to Part B – Coding ]


June 17, 2016 @ 7:31 pm
How to print ???
March 6, 2017 @ 4:45 pm
Hi, I’m using Visual Studio Community 2015, VB, Windows forms. I’m following your tutorial, but I’m having a problem finding the MenuStrip control’s smart tag glyph? I have used it maybe once or twice since installing VS, but in most of my projects, it just never appears? I understand it is automatic for controls which accept it, but it’s not appearing on menu strip control? I’ve used it before on menu strip control in one project, but it usually doesn’t appear at all in any of my projects? Do you have any ideas? I have looked around in VS, but can’t find any way to enable this control or to insert standard menu/toolbox items? Any help would be appreciated! Thanks!
October 15, 2017 @ 5:42 pm
Ur program have problem. Example When u make ur txt bold italic or strikethrough and u click underline they all become regular fontstyle with strikethrough bold italic or strikethrough are gone!! Same when u use italic or bold or any other font style.