ASP.NET Web Pages – Layout Pages (Continued – RenderPage & RenderSection)
[This tutorial continues from a previous tutorial, Layout Pages ]
RenderPage
The RenderPage method allows you to render code from an external page. It is useful if you want to keep the footer and header in separate pages and call them into the layout page. This avoids very long pages and keeps code neat. It is similar to the PHP include function.
- In the shared folder create two new files: _Header.cshtml and _Footer.cshtml
- From the layout page copy and remove the content between the <header> tag and place it in the _Header.cshtml
Next in <header> tag in the layout page put:
@RenderPage("~/shared/_Header.cshtml")
- Do the same for the footer, but make sure you change the file name
- Now run the default.cshtml page and you should notice no change; however if you open the _Header or _Footer file and change the content and then refresh, you should see the change.
The layout page will merge with the external pages and the result will be printed to the browser.
RenderSection()
One of the drawbacks of the RenderPage method is that it cannot manage optional content. For example, you might have a sidebar but don’t want to render it on every page. Sections are a way around this.
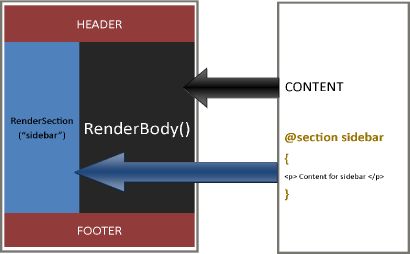
The RenderSection method takes two arguments: the first is the section name and the second is Boolean, which specifies if the section is required or not. The default is true, so it will be required. The diagram below shows how sections work, and it is similar to layout pages.
When the section is defined everything is merged together.
In the layout page, replace the <aside> markup with the following:
<aside>
 @RenderSection("sidebar")
</aside>
Run the default.cshtml in the browser and you will receive an error. As we did not put false, the section will always be required. Change the code so it looks like this:
@RenderSection("sidebar", false)
In the default.cshtml insert the following:
@section sidebar{

<ul>
<li>Coffee</li>
<li>Tea</li>
<li>Milk</li>
</ul>

}
The @section defines the section. Run the default.cshtml in your browser and you should see the above output render. As previously stated, everything is merged together to give the final result. The RenderSection method can be useful for the <head> section of an HTML document, as you might want to insert markup from a content page there.
Passing Data
You can pass data between layout pages and content pages. This is part of the PageData, which is a dictionary and allows you to share data between pages (such as Title, Meta Tags, etc). It uses an array-like syntax. We will use the Page property, which does the same function but is based on property syntax.
In the Layout page in the <title> tag, insert the following:
@Page.Title
You can essentially name the property whatever you like, but it must match in the content pages. Here it is Title, so in the content page it must be referred to as:
@Page.Title = “Home”;
Try this:
- In the layout page add the following line below the <title> tag
<meta name="description" content="@Page.mDescription"/>
- Now in the default.cshtml in the code blocks or at the top of the page, insert the following:
Page.Title = "Home";
Page.mDescription = "The home page";
When you run the content page you should see the title change in your browser, and if you view the source you should see the description.
Summary
This tutorial covered layout pages, RenderPage, and RenderSection methods. Layout pages are very simple to use, and they allow easy maintenance and control of your website’s look and feel. The next tutorial will look at nested layouts.

